Redux folder structure for large React projects (2026)
Learn the feature-based Redux folder structure that scales in large React projects. Covers classic Redux, Redux Toolkit, createAsyncThunk, and RTK Query with working code examples.

State management in React is simple at the start. Props carry data down, callbacks carry events up, and Context handles anything shared between sibling components. Then the application grows. Features multiply, teams expand, and the same piece of data ends up being read and written from a dozen unrelated places. That is when the absence of a clear state contract stops being manageable and starts causing real bugs.
The Redux folder structure you choose at the start determines how much that pain compounds. Organizing by file type, one folder for actions, one for reducers, one for constants, works in a tutorial but collapses in a real codebase because adding any feature means touching three separate directories with invisible dependencies between them. Organizing by feature keeps everything for one domain in one place and scales cleanly as the team grows.
This guide covers a feature-based Redux folder structure and architecture for large React projects, using both the classic approach and its modern equivalent with Redux Toolkit.
What Redux does
Redux maintains your application data in a centralized store. Any component anywhere in the component tree can read from the store or dispatch an action to update it, without prop drilling. If you want to understand how state management works at the most basic level before adding Redux, this walkthrough on state management using plain HTML and JavaScript covers the core concept.
Classic Redux vs Redux Toolkit
The Redux team's official position since 2019 is that the redux core package is obsolete for new code. Redux Toolkit (@reduxjs/toolkit) is the only recommended path today. In 2026, Zustand has surpassed both redux and react-redux in weekly npm downloads at roughly 27.9 million downloads per week versus React Redux's 21.5 million. That context matters when you are choosing a tool for a new project.
Redux Toolkit is the right fit when your team needs enforced patterns across a large codebase, time-travel debugging via DevTools, complex middleware chains, or a built-in data fetching and caching layer through RTK Query. For a mid-size application or a solo project, Zustand offers the same mental model with far less setup.
This guide shows the classic Redux setup first because most large production codebases still run it. Understanding the classic pattern makes the RTK equivalent easier to read and gives you the context to migrate incrementally.
Prerequisites
This guide uses CodeSandbox. You need working knowledge of JavaScript and React to follow along. For new projects, the fastest start is the official Redux + Vite template:
npx degit reduxjs/redux-templates/packages/vite-template-redux my-app
cd my-app
npm install
npm run dev
This gives you a fully configured RTK project with TypeScript, DevTools, and an example slice out of the box. The manual setup below is for teams adding Redux to an existing project or learning the underlying structure.
Install dependencies
npm install redux react-redux redux-actions
Redux folder structure: organize by feature, not by file type
The most important Redux architecture decision is the folder structure. Organizing by file type puts actions in one folder, reducers in another, and constants in a third. Adding a new feature means touching three separate directories and tracing invisible dependencies between them. Organizing by feature keeps everything for one domain in one folder. Adding a new feature means adding one folder and wiring one line into the root reducer.
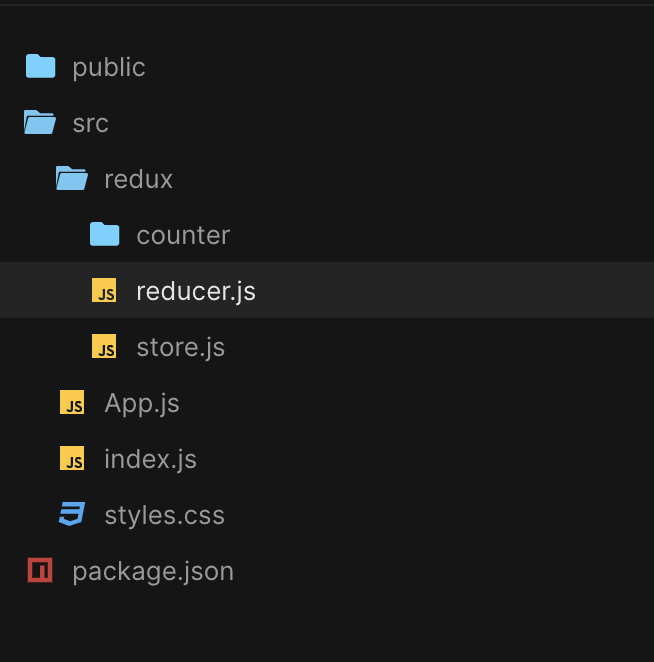
The index.js inside each feature folder is the feature reducer. reducer.js at the root combines all feature reducers. store.js at the root creates and exports the store.
In a production app with multiple domains, the same pattern scales to any number of feature folders:
src/
  redux/
    auth/
    cart/
    catalog/
    notifications/
    reducer.js
    store.js
Each domain folder owns its slice of state and has no direct knowledge of other slices. Adding orders/ later means adding one folder and one line in reducer.js. Nothing else changes.
Core concepts
Every Redux feature is built from three things. A constant is a unique string identifying an action type, written as "FeatureName/ActionName" to namespace it and prevent collisions across features. An action is a function returning an object that contains the constant and any optional payload data. A reducer is a function that takes the current state and the dispatched action and returns the next state.
Step 1: create the increment action
In redux/counter/increment-counter-action.js:
import { createAction } from 'redux-actions';

export const IncrementCounterRdxConst = 'Counter/IncrementCounter';

export const IncrementCounterAction = createAction(
  IncrementCounterRdxConst,
  (payload) => payload
);

export const IncrementCounterReducer = (state) => state + 1;
Each file exports its constant, action, and reducer independently. Any part of the codebase can import just the constant, just the action, or just the reducer without pulling in the entire feature module.
Step 2: create the decrement action
In redux/counter/decrement-counter-action.js:
import { createAction } from 'redux-actions';

export const DecrementCounterRdxConst = 'Counter/DecrementCounter';

export const DecrementCounterAction = createAction(DecrementCounterRdxConst);

export const DecrementCounterReducer = (state) => state - 1;
Step 3: create the feature reducer
The feature reducer at redux/counter/index.js uses a switch on the action type to route each dispatched action to its corresponding reducer function.
import { DecrementCounterReducer, DecrementCounterRdxConst } from './decrement-counter-action';
import { IncrementCounterReducer, IncrementCounterRdxConst } from './increment-counter-action';

export const counterReducer = (state = 0, action) => {
  switch (action.type) {
    case IncrementCounterRdxConst:
      return IncrementCounterReducer(state, action);
    case DecrementCounterRdxConst:
      return DecrementCounterReducer(state, action);
    default:
      return state;
  }
};
The initial state is set here. Adding a new action means adding one case and one import. Nothing else in this file changes.
Step 4: create the root reducer
redux/reducer.js merges all feature reducers using combineReducers.
import { combineReducers } from 'redux';
import { counterReducer } from './counter';

export const rootReducer = combineReducers({
  counter: counterReducer
});
State is namespaced by key. state.counter returns the counter slice. Adding a new feature domain means adding one line here.
Step 5: create the store
redux/store.js creates and exports the store. Middleware like redux-thunk and persistence libraries like redux-persist are configured here in production projects.
import { createStore } from 'redux';
import { rootReducer } from './reducer';

export const appStore = createStore(rootReducer);
Step 6: provide the store to the application
Wrap your root element with Provider in src/index.js to make the store available throughout the component tree.
import React from 'react';
import ReactDOM from 'react-dom';
import { Provider } from 'react-redux';
import { appStore } from './redux/store';
import App from './App';

ReactDOM.render(
  <Provider store={appStore}>
    <React.StrictMode>
      <App />
    </React.StrictMode>
  </Provider>,
  document.getElementById('root')
);
Step 7: read and dispatch state in components
useSelector reads data from the store. useDispatch returns the dispatch function for triggering actions.
import { useSelector, useDispatch } from 'react-redux';
import { IncrementCounterAction } from './redux/counter/increment-counter-action';
import { DecrementCounterAction } from './redux/counter/decrement-counter-action';

export default function App() {
  const counter = useSelector((state) => state.counter);
  const dispatch = useDispatch();

  return (
    <div>
      <h2>Counter: {counter}</h2>
      <button onClick={() => dispatch(IncrementCounterAction())}>Increment</button>
      <button onClick={() => dispatch(DecrementCounterAction())}>Decrement</button>
    </div>
  );
}
You can find the complete CodeSandbox demo here.
The Redux Toolkit equivalent
For new projects, the same counter using RTK's createSlice removes the manual constants, action creators, and separate reducer files entirely. The feature-per-folder structure stays the same — one slice file per domain instead of multiple action files.
// redux/counterSlice.js
import { createSlice } from '@reduxjs/toolkit';

const counterSlice = createSlice({
  name: 'counter',
  initialState: 0,
  reducers: {
    increment: (state) => state + 1,
    decrement: (state) => state - 1
  }
});

export const { increment, decrement } = counterSlice.actions;
export default counterSlice.reducer;
// redux/store.js
import { configureStore } from '@reduxjs/toolkit';
import counterReducer from './counterSlice';

export const store = configureStore({
  reducer: {
    counter: counterReducer
  }
});
createSlice generates action creators and type constants automatically. configureStore wires in redux-thunk and Redux DevTools by default.
Handling async logic with createAsyncThunk
In large applications, most state changes involve an API call. createAsyncThunk handles async operations with built-in pending, fulfilled, and rejected lifecycle states, eliminating the boilerplate of writing three action types per request.
// redux/ordersSlice.js
import { createSlice, createAsyncThunk } from '@reduxjs/toolkit';

export const fetchOrders = createAsyncThunk(
  'orders/fetchAll',
  async (userId) => {
    const response = await fetch(`/api/orders?user=${userId}`);
    return response.json();
  }
);

const ordersSlice = createSlice({
  name: 'orders',
  initialState: { data: [], status: 'idle', error: null },
  reducers: {},
  extraReducers: (builder) => {
    builder
      .addCase(fetchOrders.pending, (state) => {
        state.status = 'loading';
      })
      .addCase(fetchOrders.fulfilled, (state, action) => {
        state.status = 'succeeded';
        state.data = action.payload;
      })
      .addCase(fetchOrders.rejected, (state, action) => {
        state.status = 'failed';
        state.error = action.error.message;
      });
  }
});

export default ordersSlice.reducer;
Dispatch it from a component the same way as any other action:
dispatch(fetchOrders(userId));
The slice handles all three states automatically. Components read state.orders.status to show loading or error UI without any additional logic.
RTK Query for data fetching
For teams where API fetching is the primary use of Redux state, RTK Query removes the need to write thunks, reducers, and loading state management entirely. It generates hooks, handles caching, background refetching, and cache invalidation automatically.
// redux/api/ordersApi.js
import { createApi, fetchBaseQuery } from '@reduxjs/toolkit/query/react';

export const ordersApi = createApi({
  reducerPath: 'ordersApi',
  baseQuery: fetchBaseQuery({ baseUrl: '/api' }),
  endpoints: (builder) => ({
    getOrders: builder.query({
      query: (userId) => `/orders?user=${userId}`
    }),
    createOrder: builder.mutation({
      query: (body) => ({
        url: '/orders',
        method: 'POST',
        body
      })
    })
  })
});

export const { useGetOrdersQuery, useCreateOrderMutation } = ordersApi;
Wire the API into the store:
import { configureStore } from '@reduxjs/toolkit';
import { ordersApi } from './api/ordersApi';

export const store = configureStore({
  reducer: {
    [ordersApi.reducerPath]: ordersApi.reducer
  },
  middleware: (getDefaultMiddleware) =>
    getDefaultMiddleware().concat(ordersApi.middleware)
});
Use the generated hook in any component:
function OrderList({ userId }) {
  const { data, isLoading, error } = useGetOrdersQuery(userId);

  if (isLoading) return <p>Loading...</p>;
  if (error) return <p>Failed to load orders.</p>;

  return <ul>{data.map(o => <li key={o.id}>{o.status}</li>)}</ul>;
}
RTK Query is the recommended approach for any data-heavy application where you would otherwise write thunks and manual cache logic.
FAQ
Always start with Redux Toolkit. It is the official recommendation from the Redux team and removes the manual boilerplate entirely. Use the official Vite + Redux template (npx degit reduxjs/redux-templates/packages/vite-template-redux) for the fastest start. Classic Redux continues to run in large codebases written before 2019 that have not yet migrated.
Start by swapping createStore for configureStore. This requires no modifications to existing reducers and immediately enables DevTools support and thunk middleware. From there, migrate features to createSlice one at a time as they are touched. The Redux team maintains an official incremental migration guide.
One per independent domain. Common examples are auth, cart, catalog, and notifications. Each folder owns its slice of state and has no direct knowledge of other slices.
In classic Redux, async actions use redux-thunk middleware added during store creation. In RTK, createAsyncThunk handles async operations with built-in pending, fulfilled, and rejected states. For teams building data-heavy applications, RTK Query generates reducers, middleware, and hooks automatically and removes the need for manual thunks.
Zustand is the practical default for new mid-size applications. It is simpler to set up and has surpassed Redux in weekly npm downloads at roughly 27.9 million downloads per week. Redux Toolkit is the stronger choice when you need enforced patterns across a large team, time-travel debugging, or complex middleware chains with RTK Query.
About author
I love solving problems, which has led me from core engineering to developer advocacy and product management. This is me sharing everything I know.











.svg)