How to build a task app with Next.js, Prisma, and Better Auth
Build a full-stack task app with Next.js App Router, Prisma, Better Auth, and Neon Postgres. We’ll cover signup, sessions, and making sure users can only access their own tasks.

Signing users up and logging them in is only one part of authentication. The part I wanted to understand better while building this project was what happens afterward.
How does the application know who is making a request? How does it remember that user? And when two users have their respective tasks, how do we make sure one user cannot read or modify the other's data?
I built a small task application to work through those questions with a real project instead of treating authentication as a collection of separate concepts.
The application uses Next.js, PostgreSQL, Prisma, and Better Auth. Users can sign up, log in, create tasks, complete them, and delete them. Each task belongs to the user who created it.
The connection I wanted to understand looks like this:
User logs in
      ↓
Session identifies the user
      ↓
session.user.id
      ↓
Server works with that user's tasks
This tutorial follows the project from database setup to authentication and user-owned data. The goal is not only to get the app working, but to understand how the authenticated user's identity reaches the database.
What we're building
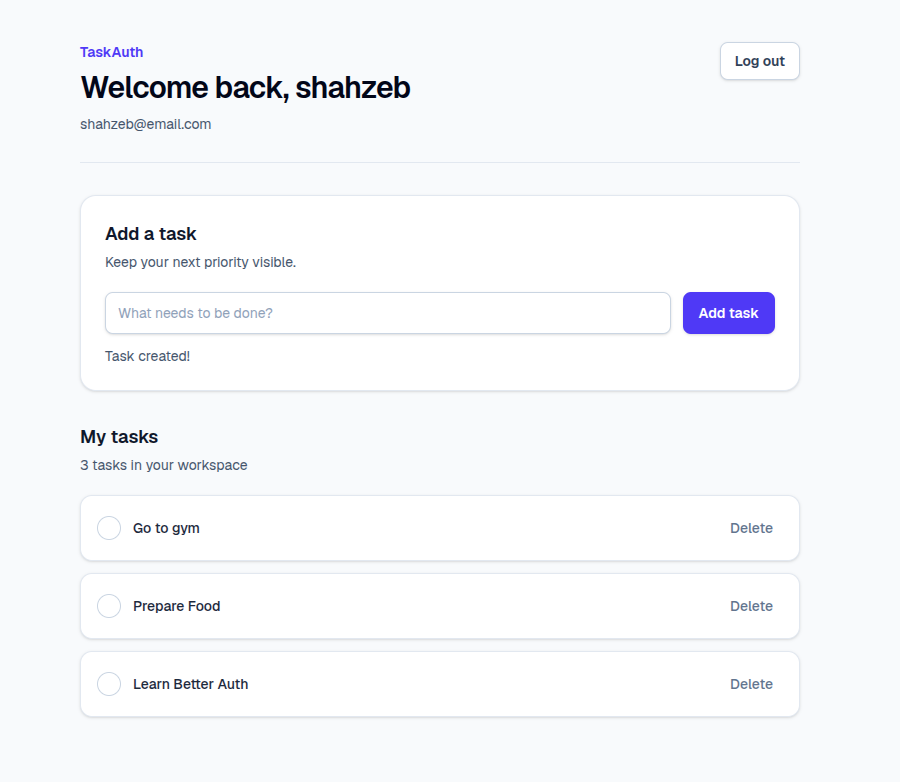
By the end, users can:
Sign up and log in
Stay authenticated with a session
Access a protected dashboard
Create, complete, and delete their own tasks
Log out
Here's the completed application:
We'll use:
Next.js for the application and API routes
PostgreSQL on Neon for the database
Prisma to work with PostgreSQL
Better Auth for authentication and sessions
This is a hands-on tutorial. You can follow it step by step to build the application. The full project, including the complete forms, API route handlers, and supporting components, is available in the GitHub repository so the article can focus on authentication, sessions, and authorization.
One rule will appear throughout the project:
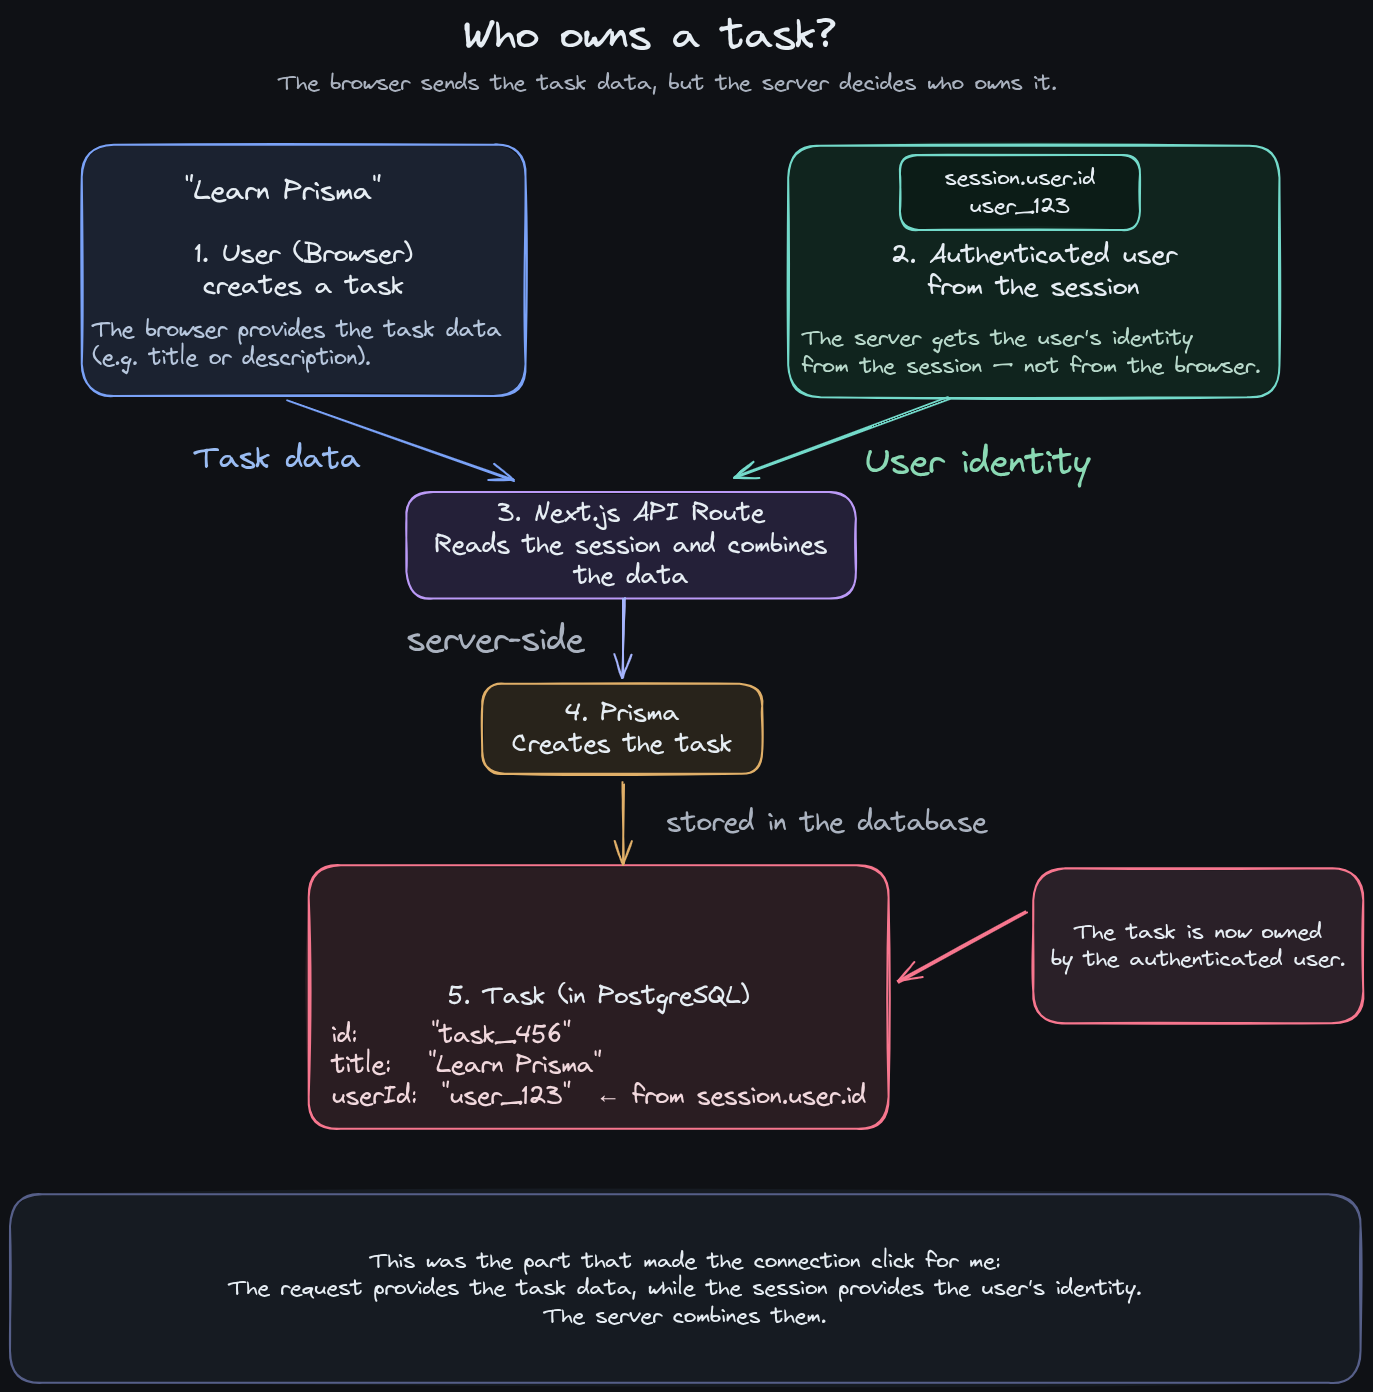
The browser can send task data, but it should not decide who owns a task.
The server gets the user's identity from the authenticated session.
What you'll need
You'll need Node.js and npm installed, basic JavaScript or TypeScript knowledge, basic familiarity with React and Next.js, a Code Editor, and a Neon account.
The project uses the Next.js App Router.
Project folder and file structure
Here are the important files we'll create:
src/
├── app/
│   ├── api/
│   │   ├── auth/
│   │   │   └── [...all]/
│   │   │       └── route.ts
│   │   │
│   │   └── tasks/
│   │       ├── route.ts
│   │       └── [id]/
│   │           └── route.ts
│   │
│   ├── dashboard/
│   │   └── page.tsx
│   ├── login/
│   │   └── page.tsx
│   └── signup/
│       └── page.tsx
│
├── components/
│   ├── LoginForm.tsx
│   ├── LogoutButton.tsx
│   ├── SignupForm.tsx
│   ├── TaskForm.tsx
│   └── TaskItem.tsx
│
├── generated/
│   └── prisma/           # generated after running prisma generate
│
└── lib/
    ├── auth.ts
    ├── auth-client.ts
    └── prisma.ts

prisma/
├── migrations/
└── schema.prisma

.env             # contains your local environment variables
.env.example     # template for required environment variables
prisma.config.ts
You don't need to create every file at the beginning. We'll add files when the project needs them.
Step 1: Create the Next.js project
Let's start by creating a new Next.js project:
npx create-next-app@latest task-auth
Choose TypeScript and the App Router during setup. Once the project is ready, move into the project directory and start the development server:
cd task-auth
npm run dev
After setup is complete, you'll see a local URL in the terminal. Open that URL and verify that the default Next.js application loads without any errors.
This gives us a working starting point before we add the database, authentication, and task functionality.
Step 2: Set up PostgreSQL and Prisma
Create a PostgreSQL database with Neon
Our application needs to store users, sessions, and tasks, so the next step is setting up a database.
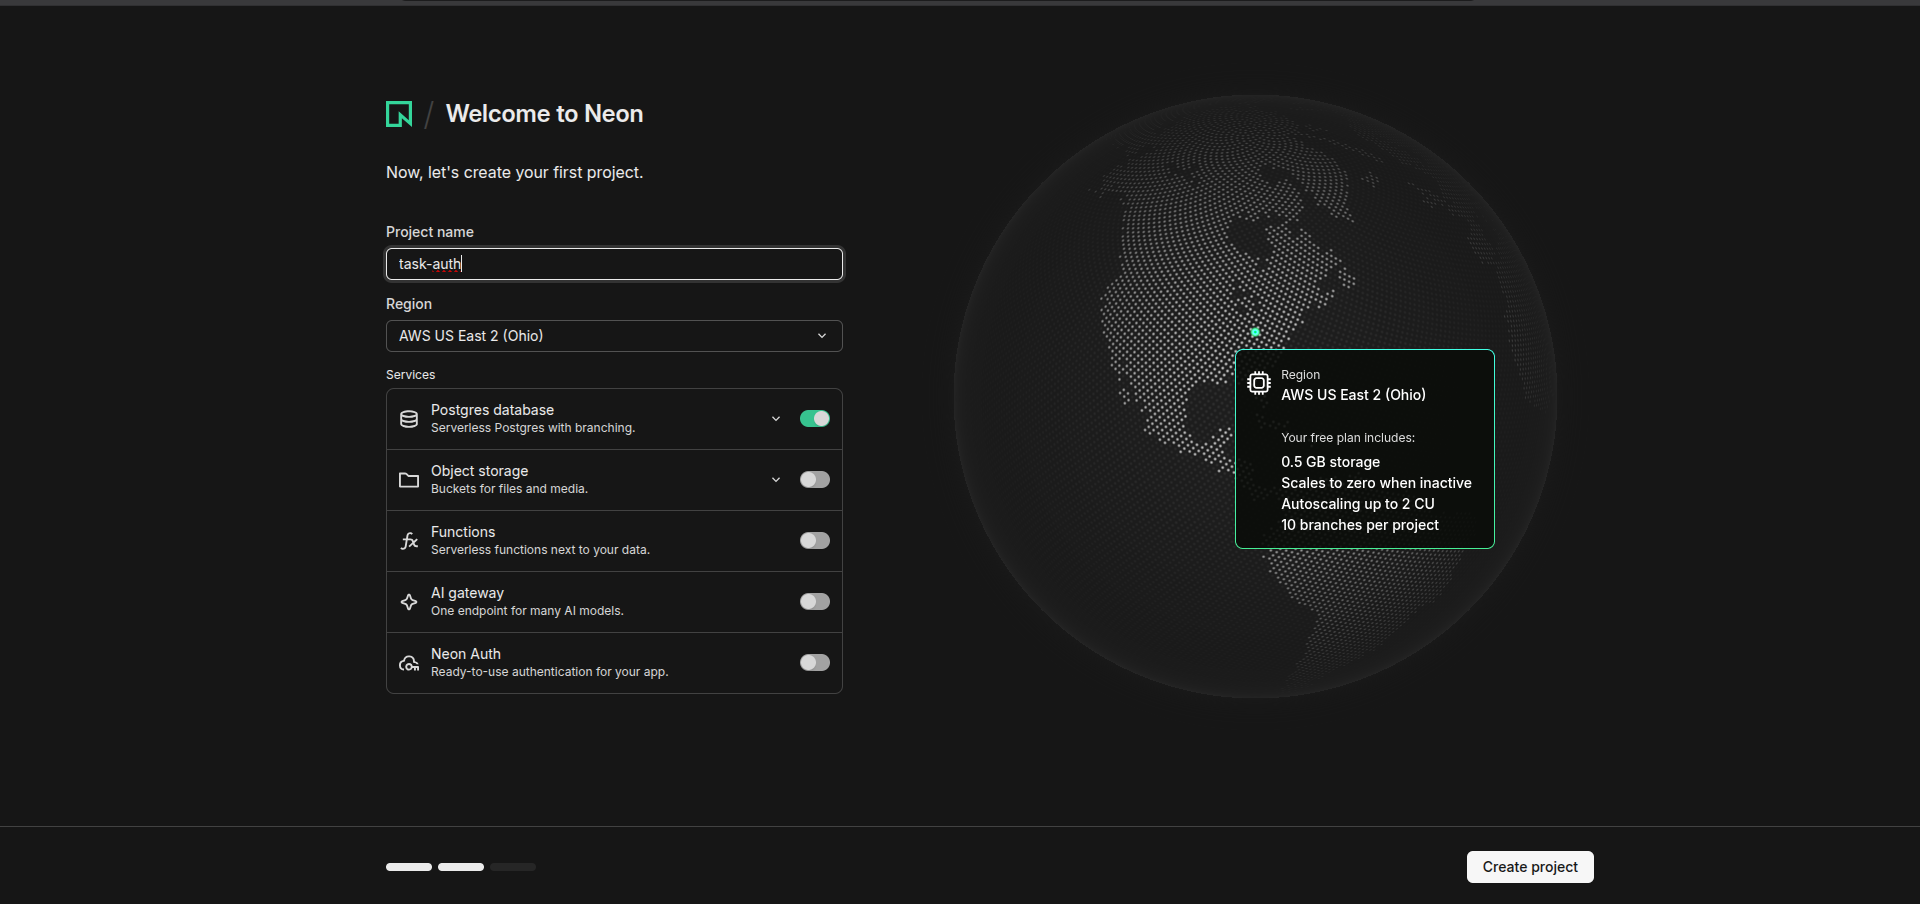
I used Neon for this project because it provides a hosted PostgreSQL database, so I didn't have to set up and manage PostgreSQL locally. Its free plan also makes it convenient for learning and small projects.
Create a Neon project and copy its PostgreSQL connection string.
Create a .env file in the root of your Next.js project:
DATABASE_URL="your-neon-connection-string"
BETTER_AUTH_SECRET="your-generated-secret"
BETTER_AUTH_URL="http://localhost:3000"
The application uses three environment variables:
DATABASE_URL connects Prisma to PostgreSQL.
BETTER_AUTH_SECRET allows Better Auth to securely handle authentication data.
BETTER_AUTH_URL identifies the application's URL.
For local development, BETTER_AUTH_URL should point to:
http://localhost:3000
Generate a secret with:
openssl rand -base64 32
Copy the generated value and use it for BETTER_AUTH_SECRET.
When you deploy the application, update BETTER_AUTH_URL to your production URL and add the same environment variables to your hosting provider.
Connect Prisma to PostgreSQL
I used Prisma to define the database schema and query PostgreSQL from TypeScript.
While building this project, I used matching Prisma package versions:
npm install -D [email protected]
npm install @prisma/[email protected] @prisma/[email protected] pg dotenv
Keeping the Prisma packages on matching versions helps avoid version mismatches between the CLI, client, and adapter.
The packages have different jobs:
prisma provides the Prisma CLI.
@prisma/client lets the application query the database.
@prisma/adapter-pg connects this Prisma setup to PostgreSQL.
pg provides the PostgreSQL driver.
dotenv loads environment variables.
Initialize Prisma
Run:
npx prisma init --datasource-provider postgresql --output ../src/generated/prisma
This creates the Prisma schema and configuration. The Prisma Client will be generated at:
src/generated/prisma
Open prisma.config.ts and configure Prisma to read the database URL:
import "dotenv/config";
import { defineConfig } from "prisma/config";

export default defineConfig({
  schema: "prisma/schema.prisma",

  migrations: {
    path: "prisma/migrations",
  },

  datasource: {
    url: process.env["DATABASE_URL"],
  },
});
The connection string remains in .env. Prisma reads it when running database commands such as migrations.
Generate the Prisma Client
Prisma generates the client from your schema before the application can import and use it.
Run:
npx prisma generate
This generates the Prisma Client at the output path configured earlier:
src/generated/prisma
We'll import that generated client when creating our Prisma instance.
Create the Prisma Client
Create src/lib/prisma.ts:
import { PrismaPg } from "@prisma/adapter-pg";
import { PrismaClient } from "../generated/prisma/client";

const globalForPrisma = globalThis as unknown as {
  prisma: PrismaClient | undefined;
};

const databaseUrl = process.env.DATABASE_URL;

if (!databaseUrl) {
  throw new Error("DATABASE_URL is not set");
}

const adapter = new PrismaPg({
  connectionString: databaseUrl,
});

export const prisma =
  globalForPrisma.prisma ??
  new PrismaClient({ adapter });

if (process.env.NODE_ENV !== "production") {
  globalForPrisma.prisma = prisma;
}
Next.js reloads modules frequently during development. Instead of creating a new Prisma Client every time the module reloads, we keep one instance on globalThis and reuse it.
This is mostly a development concern, but using a single shared client also makes it clear that Prisma should be reused throughout the application.
The check for DATABASE_URL is also useful:
if (!databaseUrl) {
  throw new Error("DATABASE_URL is not set");
}
If the environment variable is missing, the application fails with a clear configuration error.
Now that Prisma is connected, we can add Better Auth and configure authentication.
Step 3: Add authentication with Better Auth
With Prisma connected, the application still has no idea who its users are.
I used Better Auth because I wanted the project to handle signup, login, and sessions without building those pieces from scratch. It uses the same PostgreSQL database we already connected through Prisma.
Install Better Auth and the Prisma adapter package used by the project:
npm install better-auth
npm install @better-auth/prisma-adapter
Create src/lib/auth.ts:
import { betterAuth } from "better-auth";
import { prismaAdapter } from "better-auth/adapters/prisma";
import { prisma } from "./prisma";

export const auth = betterAuth({
  database: prismaAdapter(prisma, {
    provider: "postgresql",
  }),

  emailAndPassword: {
    enabled: true,
  },
});
The Prisma adapter gives Better Auth access to PostgreSQL through the Prisma client, while this configuration:
emailAndPassword: {
  enabled: true,
},
enables the email and password flow we'll use for signup and login.
At this point, Better Auth handles authentication-related operations, while Prisma provides its connection to the database.
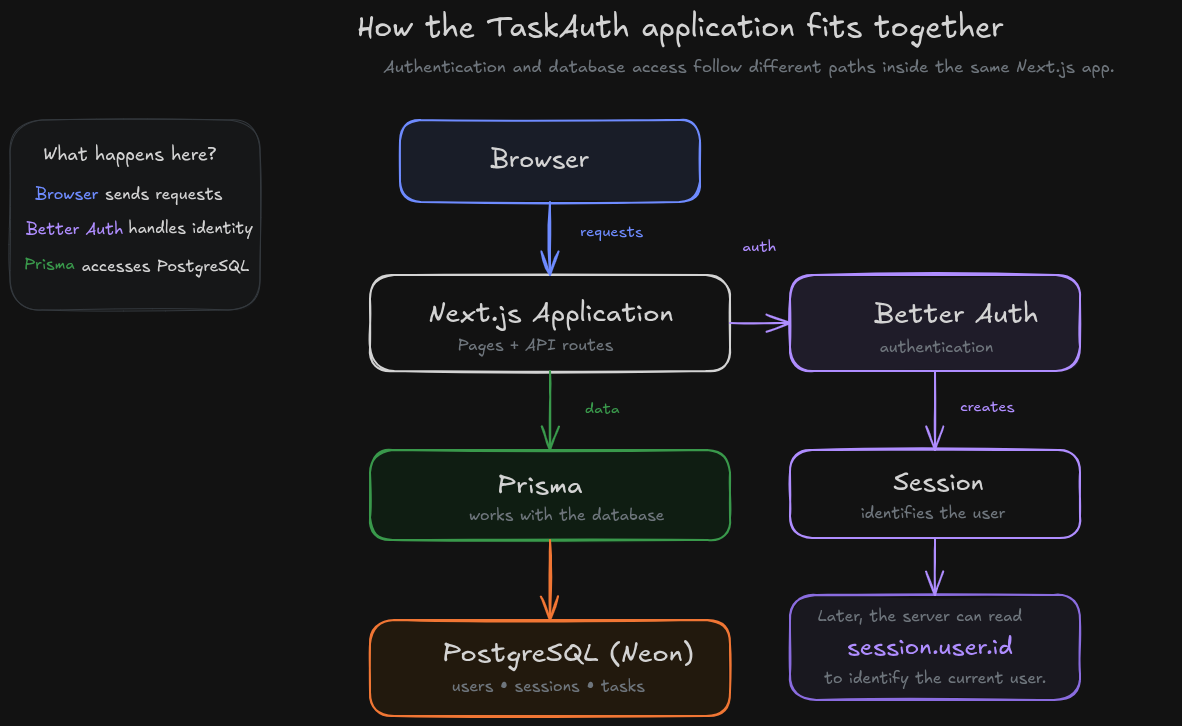
How authentication, sessions, and Prisma work together to identify users and access their tasks.
Create the browser client
The configuration above runs on the server. Our forms, however, run in the browser.
Create src/lib/auth-client.ts:
import { createAuthClient } from "better-auth/react";

export const authClient = createAuthClient();
We'll use this client in React components:
authClient.signUp.email();
authClient.signIn.email();
The distinction is worth remembering:
auth.ts configures Better Auth on the server.
auth-client.ts lets browser components start authentication actions.
Create the database schema
This is where authentication starts connecting to the application's own data.
Better Auth generates the models it needs for users, sessions, accounts, and verification data. Run:
npx auth@latest generate
When Better Auth asks whether it can update prisma/schema.prisma, choose yes.
Then format and validate the schema:
npx prisma format
npx prisma validate
Better Auth generates several models here. You didn't need to understand every field before moving on. What mattered for this project was knowing that Better Auth now had somewhere to store users, sessions, accounts, and verification data.
Our application also needs its own model.
Add the Task model
Open prisma/schema.prisma and add:
model Task {
  id        String   @id @default(cuid())
  title     String
  completed Boolean  @default(false)

  userId    String
  user      User     @relation(
    fields: [userId],
    references: [id],
    onDelete: Cascade
  )

  createdAt DateTime @default(now())
  updatedAt DateTime @updatedAt
}
The part I had to understand properly was:
userId String
Every task needs to be connected to the user who owns it.
The relationship is defined here:
user User @relation(
  fields: [userId],
  references: [id],
  onDelete: Cascade
)
Prisma also needs the other side of the relationship. Find the User model generated by Better Auth and add:
tasks Task[]
Now the relationship is:
User
 │
 ├── Task
 ├── Task
 └── Task
One user can have multiple tasks, but each task belongs to one user.
Add the Better Auth route
Create:
src/app/api/auth/[...all]/route.ts
Then add:
import { auth } from "@/lib/auth";
import { toNextJsHandler } from "better-auth/next-js";

export const { GET, POST } = toNextJsHandler(auth);
[...all] is a catch-all route. It allows Better Auth to handle requests under /api/auth/*.
The request path now looks like this:
Signup or login form
        ↓
authClient
        ↓
/api/auth/*
        ↓
Better Auth
        ↓
Prisma
        ↓
PostgreSQL
Run the migration:
npx prisma migrate dev --name init
npx prisma generate
The migration applies the schema changes to PostgreSQL. Running prisma generate ensures the generated Prisma Client is updated to match the latest schema.
After the migration succeeds, check Neon and confirm that the tables were created.
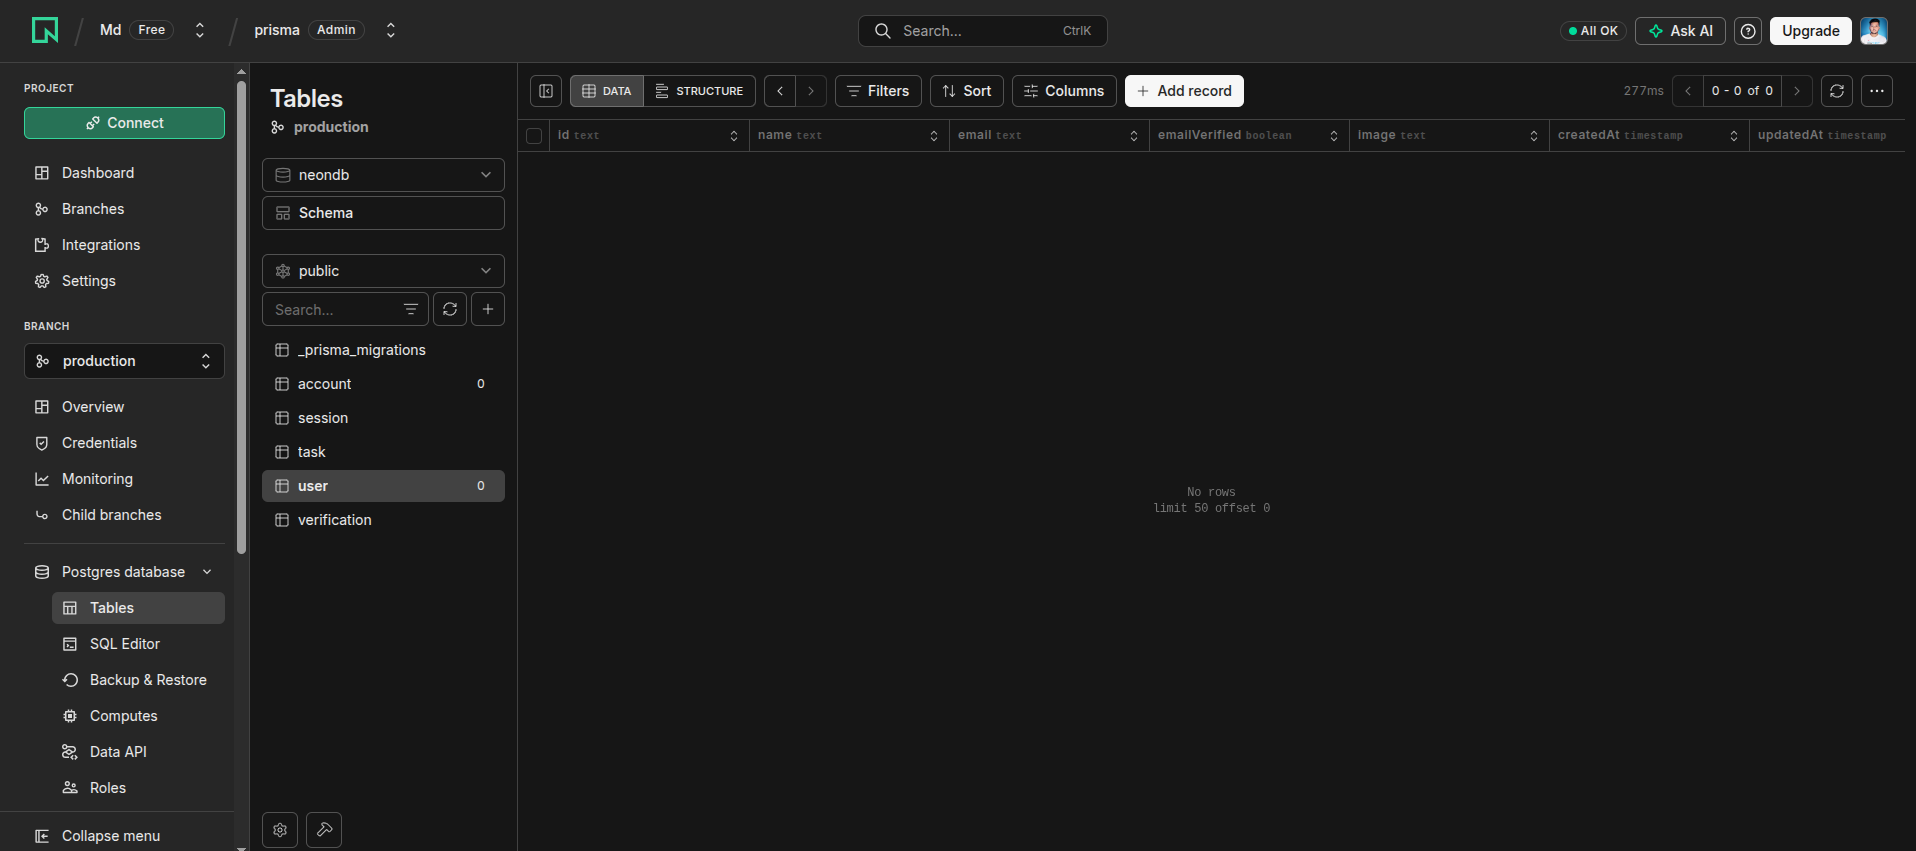
This is a useful verification step. It confirms that the schema was not only valid locally but was applied to PostgreSQL.
Step 4: Build signup and login
The exact design of the forms is not the focus here. The complete SignupForm and LoginForm implementations are available in the repository; here, I want to focus on where the authentication request goes and what happens after the form submits.
In the signup form, the main call is:
await authClient.signUp.email({
  email,
  password,
  name: email.split("@")[0],
});
The browser collects the user's details and sends the signup request through Better Auth.
The browser does not communicate directly with Prisma or PostgreSQL:
Signup form
     ↓
authClient.signUp.email()
     ↓
Better Auth
     ↓
Prisma
     ↓
PostgreSQL
After creating a test account, check Neon and confirm that the user was created. This verifies the full path instead of assuming that a successful UI message means everything worked.
The login flow is similar:
await authClient.signIn.email({
  email,
  password,
});
When the credentials are valid, Better Auth creates a session.
Signup and login are related, but they do different things:
signUp.email() creates the account.
signIn.email() verifies credentials and creates a session.
Step 5: Understand how sessions identify the user
Logging in is only part of the story. The application still needs to know who is making later requests.
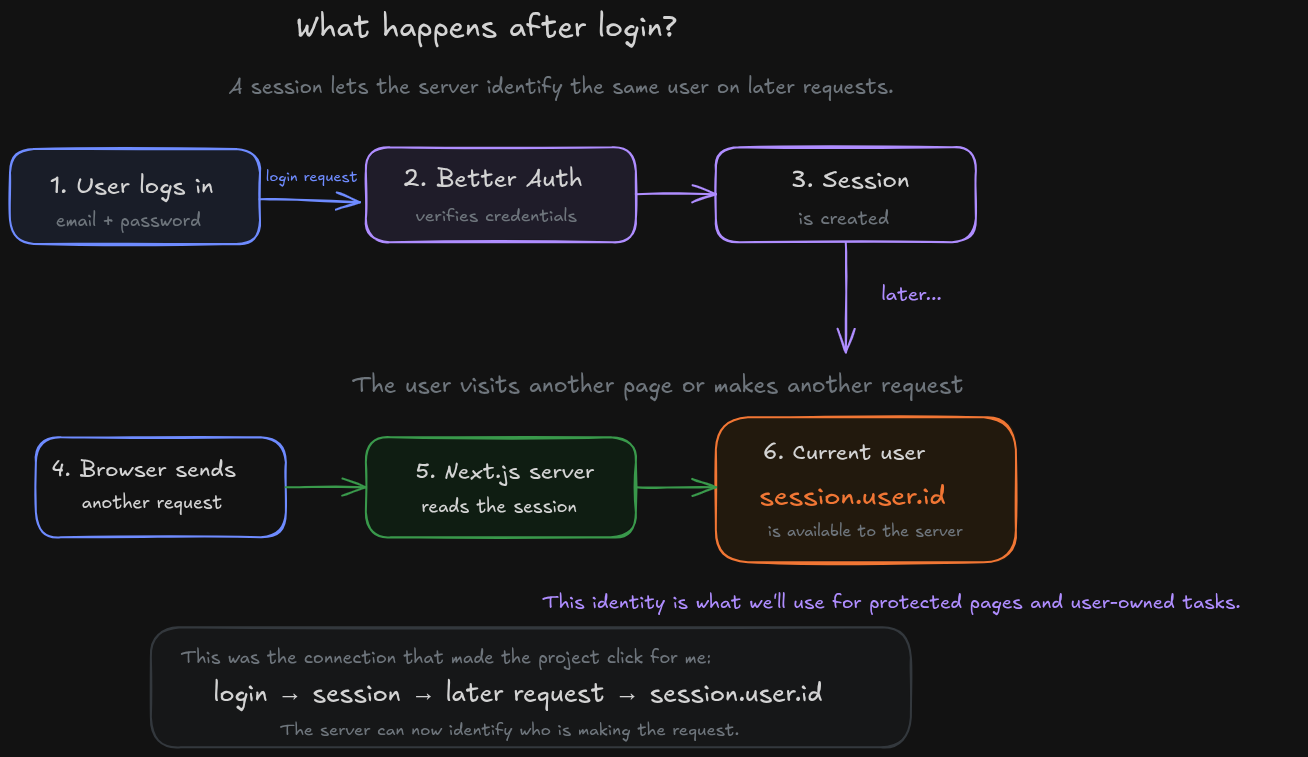
When Better Auth logs a user in, it creates a session:
User logs in
      ↓
Credentials are verified
      ↓
Session is created
      ↓
User makes another request
      ↓
Server reads the session
      ↓
Server identifies the user
On the server, retrieve the current session with:
const session = await auth.api.getSession({
  headers: await headers(),
});
A valid session contains information about the user, including:
session.user.id
session.user.name
session.user.email
The value that connects most of this project is:
session.user.id
That ID will later protect the dashboard, determine which tasks to return, assign ownership when a task is created, and stop users from modifying tasks that belong to someone else.
For this project, the distinction is:
Authentication verifies the user's credentials.
The session lets the server identify that authenticated user on later requests.
We don't need to memorize every implementation detail about cookies to continue. The important part is knowing that a valid session gives the server an authenticated identity.
Step 6: Protect the dashboard and create user-owned tasks
A user should not be able to open /dashboard without logging in.
In src/app/dashboard/page.tsx, retrieve the session:
import { headers } from "next/headers";
import { redirect } from "next/navigation";

import { auth } from "@/lib/auth";

export default async function DashboardPage() {
  const session = await auth.api.getSession({
    headers: await headers(),
  });

  if (!session) {
    redirect("/login");
  }

  return (

      Welcome, {session.user.name}

  );
}
The page asks Better Auth for the current session. If none exists, the server redirects the visitor:
if (!session) {
  redirect("/login");
}
Because this check happens while the page is rendered on the server, the protected dashboard is not rendered for an unauthenticated visitor.
The flow is straightforward:
User requests /dashboard
        ↓
Server reads the session
        ↓
Valid session?

Yes → Render dashboard
No  → Redirect to /login
Add logout
A logout button runs in the browser, so it belongs in a Client Component.
The main action is:
await authClient.signOut();
Then redirect the user:
router.push("/");
Connect the session to tasks
The task model already contains:
userId String
Now the application needs to decide what value goes into that field.
The browser should send task data, such as:
{
  "title": "Learn Prisma"
}
When I tested this request in Chrome DevTools, I noticed something that confused me at first. I was creating a task without sending any user ID.
I could send:
{
  "title": "Learn Prisma"
}
The task was still created successfully.
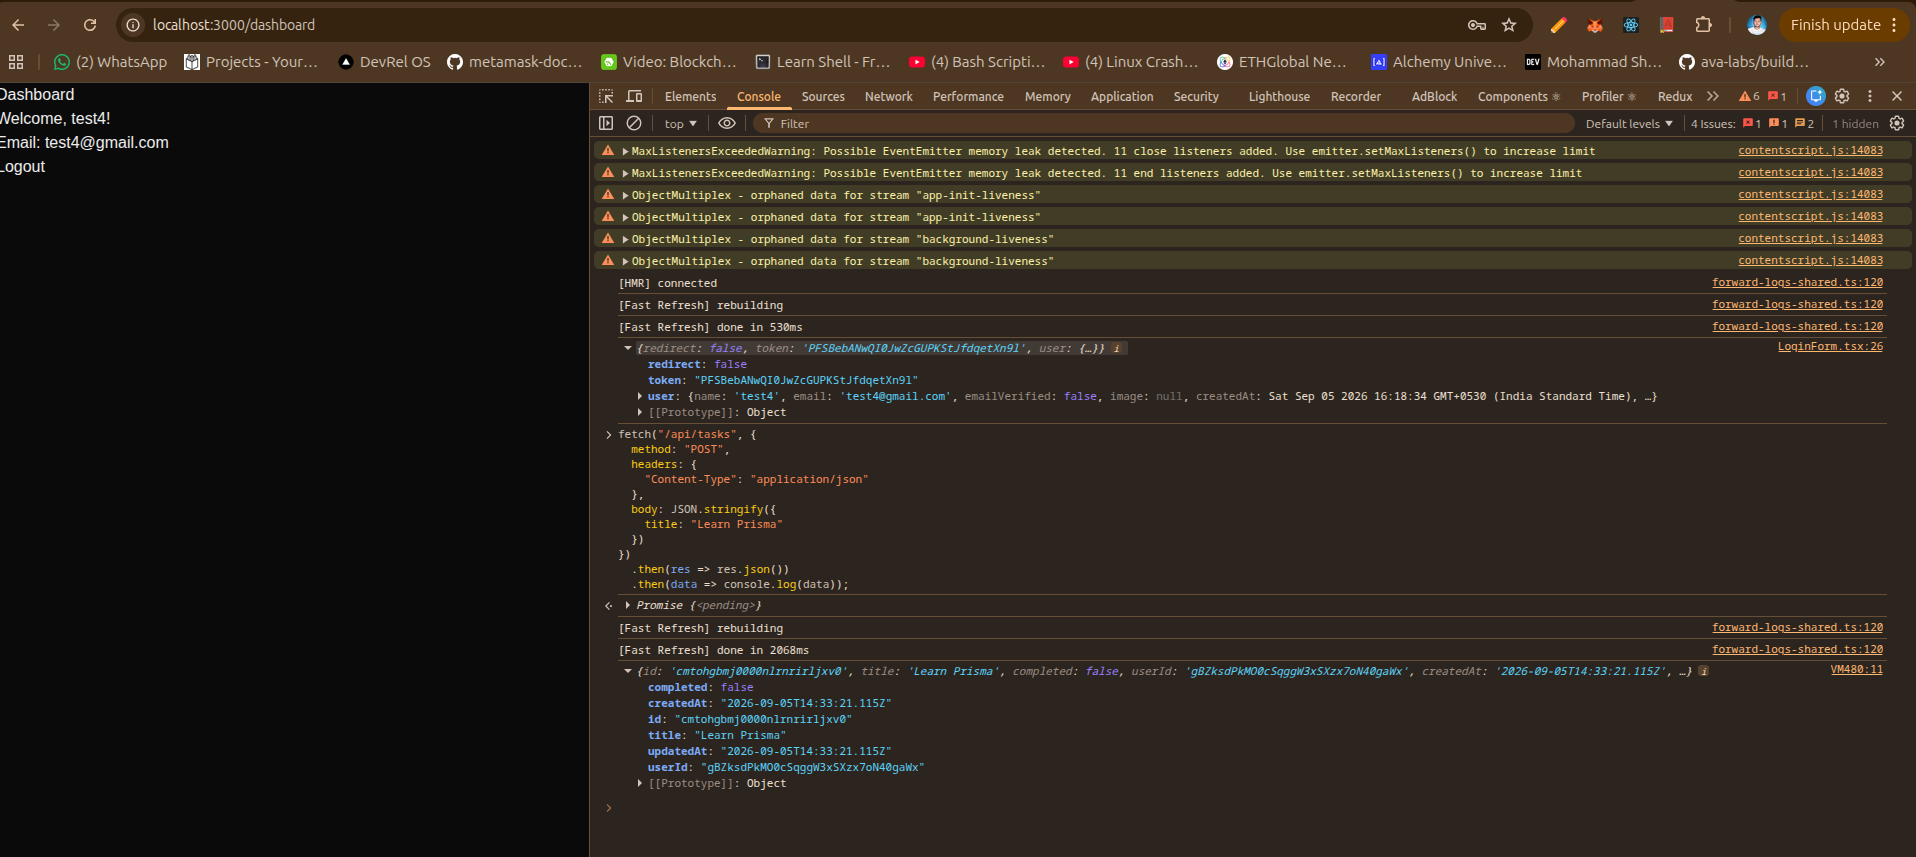
Notice what is missing: userId.
The browser should not decide who owns the task. The server already knows who is making the request by checking the authenticated session.
Create src/app/api/tasks/route.ts and begin by checking the session. The repository contains the complete GET and POST handlers; we'll walk through the parts that establish identity, ownership, and validation:
export async function GET() {
  const session = await auth.api.getSession({
    headers: await headers(),
  });

  if (!session) {
    return NextResponse.json(
      { error: "Unauthorized" },
      { status: 401 }
    );
  }
  // Query the current user's tasks
}
Now the server can retrieve tasks for the current user:
const tasks = await prisma.task.findMany({
  where: {
    userId: session.user.id,
  },
});
This is the connection we prepared in the database schema.
Every task stores a userId. The current session provides the ID of the user making the request. Prisma therefore returns only tasks where those values match.
The same route can therefore serve every user without returning another user's tasks.
Create a task
Before saving the task, validate the request:
const body = await request.json();
const { title } = body;

if (typeof title !== "string") {
  return NextResponse.json(
    { error: "Title is required" },
    { status: 400 }
  );
}

const trimmedTitle = title.trim();

if (!trimmedTitle) {
  return NextResponse.json(
    { error: "Title is required" },
    { status: 400 }
  );
}
Then create the task:
const task = await prisma.task.create({
  data: {
    title: trimmedTitle,
    userId: session.user.id,
  },
});
The two values come from different places: title comes from the request, while userId comes from the authenticated session. That distinction matters because, even if someone changes a request in the browser, the server does not trust the client to choose the owner of the task.
User creates a task
        ↓
Browser sends the title
        ↓
Server reads the session
        ↓
session.user.id
        ↓
Server creates the task with that userId
This is where authentication becomes connected to the application's data model rather than existing only around login screens.
Step 7: Authorize task updates and deletion
Creating tasks with the correct userId solves only part of the problem. If a user somehow knows another task's ID, the application still needs to stop them from updating or deleting it.
This is where the difference between authentication and authorization becomes visible in the code.
Create:
src/app/api/tasks/[id]/route.ts
Before updating or deleting a task, check the current session and search for a task that matches both the task ID and the current user's ID. The repository contains the complete PATCH and DELETE handlers.
The [id] folder makes this a dynamic route. For example:
/api/tasks/abc123
gives the route access to abc123 as the task ID.
In modern versions of the Next.js App Router, route parameters can be asynchronous. In this project, we await params before using the task ID.
export async function PATCH(
  request: Request,
  {
    params,
  }: {
    params: Promise;
  }
) {
  const { id } = await params;

  // Continue with the session and ownership checks
}
Then the ownership query makes complete sense:
const session = await auth.api.getSession({
  headers: await headers(),
});

if (!session) {
  return NextResponse.json(
    { error: "Unauthorized" },
    { status: 401 }
  );
}

const task = await prisma.task.findFirst({
  where: {
    id,
    userId: session.user.id,
  },
});
The query checks the task ID and the authenticated user's ID together. In practice, that means the task must both exist and belong to the user making the request.
If another user knows the ID, Prisma will not return the task unless the userId matches their session.
Update a task
After confirming ownership:
await prisma.task.update({
  where: {
    id: task.id,
  },
  data: {
    completed,
  },
});
The update happens only after the ownership check.
Delete a task
Use the same pattern:
const task = await prisma.task.findFirst({
  where: {
    id,
    userId: session.user.id,
  },
});

if (!task) {
  return NextResponse.json(
    { error: "Task not found" },
    { status: 404 }
  );
}

await prisma.task.delete({
  where: {
    id: task.id,
  },
});
The server does not delete a task using only the ID from the URL.
It first connects the request to the logged-in user through the session and then checks ownership.
PATCH or DELETE request
          ↓
Server reads the session
          ↓
Find task using:
id + session.user.id
          ↓
Does the task belong to this user?

Yes → Continue
No  → Reject
This is authorization. Authentication tells the server who the user is, while authorization uses that identity to decide what the user can access.
In this application, the rule is straightforward:
A user can only update or delete tasks they own.
Step 8: Connect the frontend and test the application
The API can now work with tasks securely. Users still need an interface for creating and changing them.
The dashboard reads the current user's tasks on the server, while interactive components such as TaskForm and TaskItem send requests to the API when the user creates, updates, or deletes a task.
Use Client Components for those interactive parts. The complete TaskForm and TaskItem implementations are available in the repository, so we'll focus here on how those components communicate with the API.
Create a task
The task form sends only the title:
const response = await fetch("/api/tasks", {
  method: "POST",
  headers: {
    "Content-Type": "application/json",
  },
  body: JSON.stringify({
    title,
  }),
});
Again, there is no userId in the request. The API route reads the session and assigns ownership.
After the task is created:
router.refresh();
This refreshes the Server Component data so the dashboard can display the new task.
Update and delete tasks
To change the completed state:
await fetch(`/api/tasks/${id}`, {
  method: "PATCH",
  headers: {
    "Content-Type": "application/json",
  },
  body: JSON.stringify({
    completed: !completed,
  }),
});
To delete a task:
await fetch(`/api/tasks/${id}`, {
  method: "DELETE",
});
After either request succeeds:
router.refresh();
The frontend does not need to know how ownership is checked. It sends a request, while the server remains responsible for authentication, authorization, and database access.
User interacts with the dashboard
          ↓
Client Component sends a request
          ↓
API route
          ↓
Server checks session and ownership
          ↓
Prisma updates PostgreSQL
          ↓
router.refresh()
          ↓
Dashboard shows updated data
This separation is useful because the browser handles interaction, but it does not become responsible for security decisions.
Handle common failure cases
A working happy path is not enough, so this project also handles a few predictable failures.
Invalid task data
The API checks whether title is a string and whether it contains anything after trimming whitespace.
That prevents requests such as an empty string from reaching the database.
Requests without a session
Protecting the dashboard does not automatically protect the API.
Someone can still call /api/tasks directly, which is why every protected API route checks for a session:
if (!session) {
  return NextResponse.json(
    { error: "Unauthorized" },
    { status: 401 }
  );
}
Without a valid session, the request stops before reaching Prisma.
Another user's task
Being logged in does not mean a user can access every task.
For updates and deletions, this query enforces ownership:
where: {
  id,
  userId: session.user.id,
}
The task ID identifies the requested resource. The session identifies the requester. The server uses both values together.
Test the complete application
Test the application as a complete flow so the frontend, authentication, API routes, and database are verified together.
Test authentication
Create a new account.
Log in.
Open the dashboard.
Refresh the page and confirm that the session persists.
Log out.
Try opening /dashboard again.
After logging out, the dashboard should redirect you to /login.
Test tasks
While logged in:
Create a task.
Confirm that it appears on the dashboard.
Mark it as complete.
Refresh the page and confirm that the completed state was saved.
Delete the task.
This verifies that the frontend, API routes, Prisma, and PostgreSQL work together.
Test user ownership
Create two accounts. Add tasks while logged in as the first user, then log out and sign in as the second user.
The second user should not see the first user's tasks.
The query explains why:
where: {
  userId: session.user.id,
}
The same ownership rule applies when updating or deleting tasks.
You should also verify the API directly:
Call /api/tasks without logging in and confirm that it returns 401.
Send an empty task title and confirm that it returns 400.
Try to update or delete a task that belongs to another user.
These checks verify the application's behavior rather than only confirming that the UI looks correct.
The connection can be summarized in one flow:
User logs in
      ↓
Better Auth creates a session
      ↓
Server reads the session
      ↓
session.user.id
      ↓
Task belongs to that user
The same identity is used when creating, reading, updating, and deleting tasks. That is what connects authentication to user-owned application data.
Conclusion
You now have a working task application where users can sign up, log in, access a protected dashboard, and work only with tasks that belong to them.
You built the connection between authentication and application data from start to finish.
A user logs in, Better Auth creates a session, and the server uses that authenticated identity to determine which data the user can access and modify.
From here, you can extend the application with task editing, due dates, categories, OAuth providers, or deployment. The foundation is already there.










.svg)